Showing posts with label speed painting. Show all posts

Wednesday, 13 November 2024

Warhammer Quest : Catacombs of Terror

 Hello guys!


Coming back to fantasy stuff, I bought (without my knowledge) the Warhammer Quest, Catacombs of Terror (1995), along the main game a few years ago... One of the luckiest ebay purchases of my life :)

So I have original floor tiles, cards etc, but not the book . I printed a modified copy of the book translated into Spanish by fans, and I also had most of the metal miniatures of this game, like the necromancer Gunther Laranscheld, which was painted this week.


the original tiles


Spanish fan made book, profesionally printed.


I also was in the desperate need of evil minions, like several skeletons, and had none of them, I studied the alternative brands out there, and chose plastic skeletons by Wargames Atlantic. I am quite happy with the quality of these undead minis, they definitely do the job for my games.
Their aesthetic is ancient greek, but I did not use the more bronze age or greek stuff, and used just the bows and the spears with GW shields and GW decals on them.

The painting was ultra simple; I bought the "new"  or new for me, Citadel Contrast paints, and I am happy with the result. I am a traditional painter, who likes triads, and several highlight layers in my miniatures, but for some excepcional cases, like this, I can go for Speedpainting.

After priming in white the miniatures, I splashed on the Contrast color, then when the paint dried, just did some drybrush runs with bone and white colors and "Voilá" skeletons painted !

I hope you like this little update.

Cheers!


Tuesday, 15 November 2022

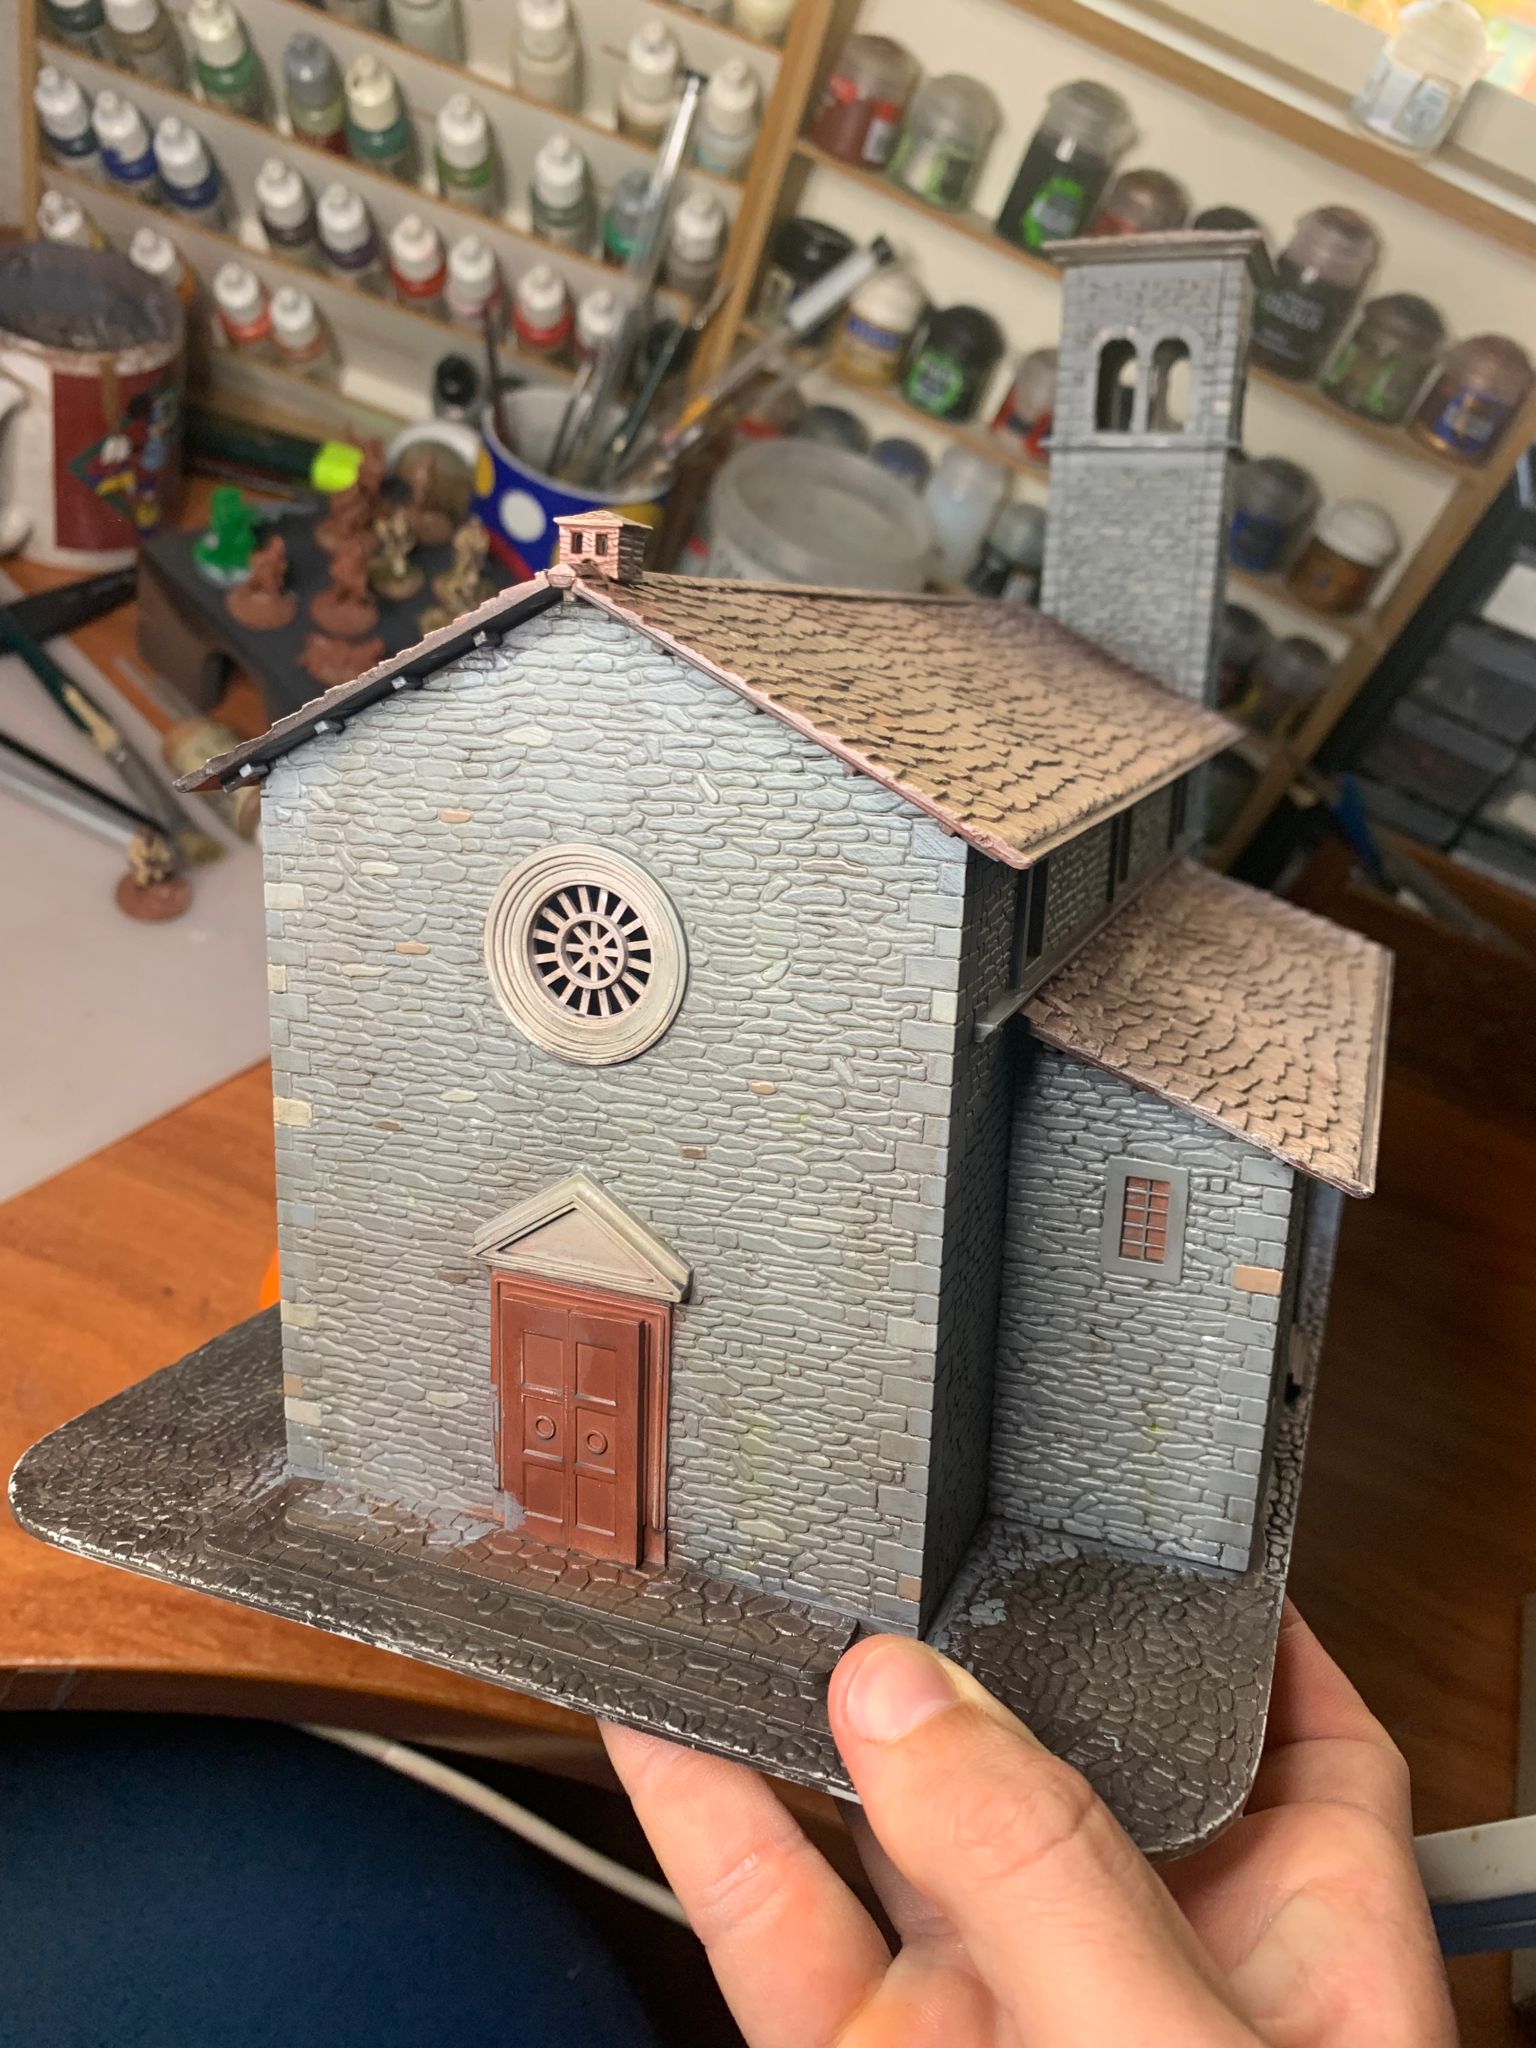
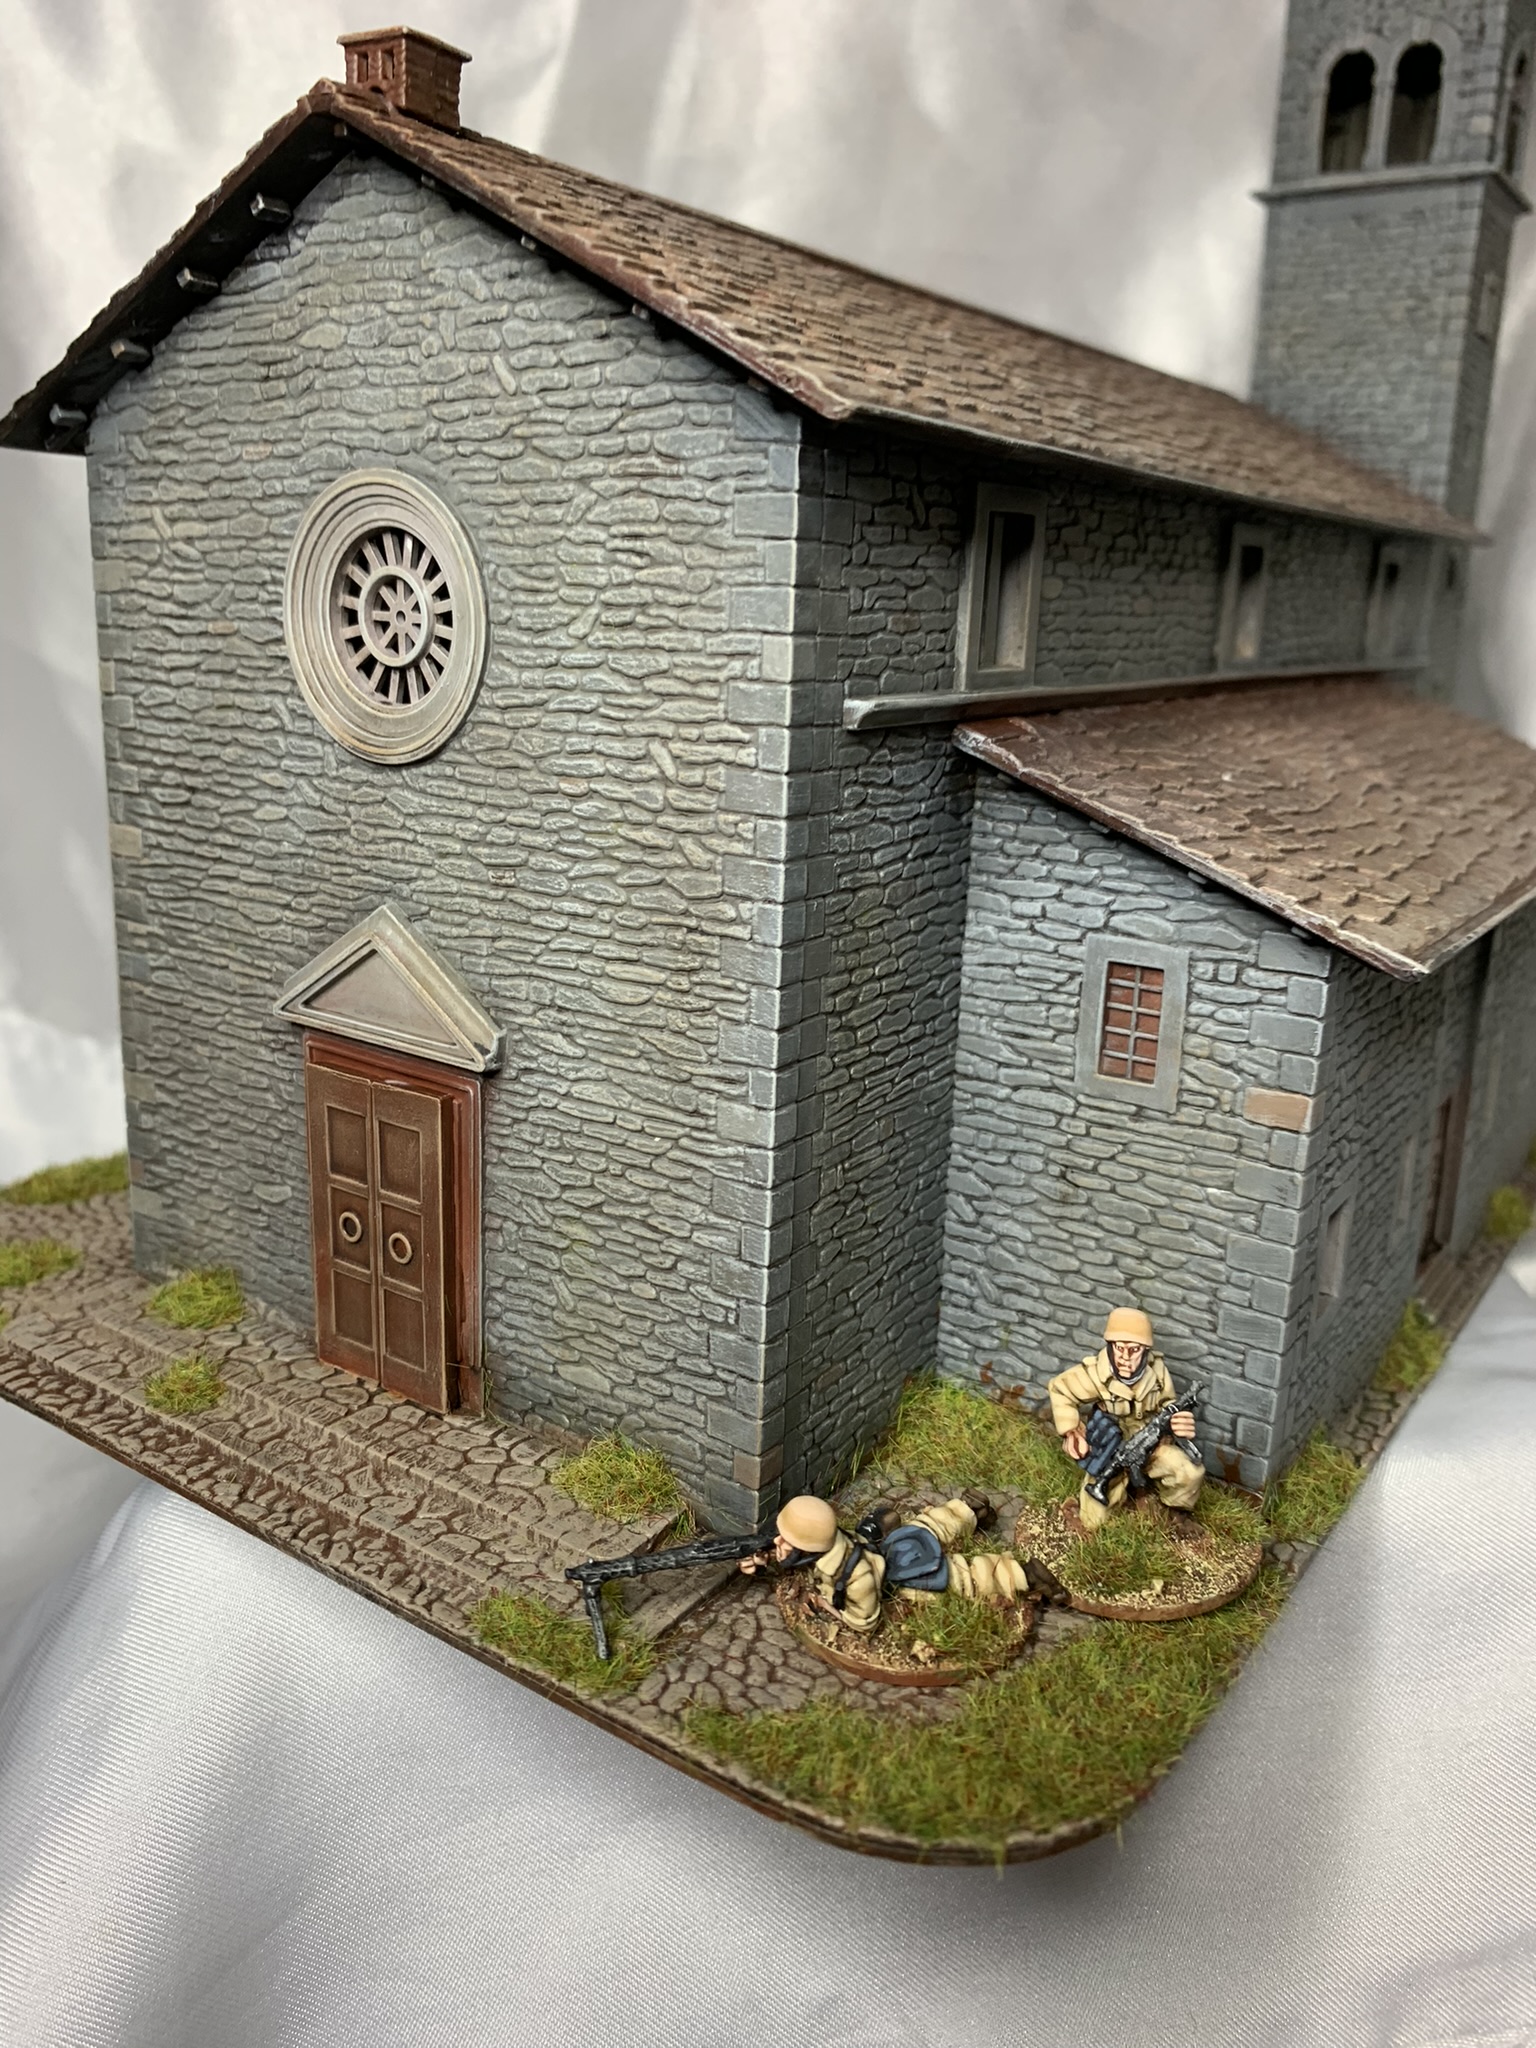
28mm Church Warlord Games/Italeri

 Hello mates,


I recently bought a second hand Warlord Games Church. It is an Italeri 1/72 scale Church, sold by Warlord as a result of collaboration between Italeri and Warlord Games since the last few years.

I wanted this kit since I saw it for the first time, although is not as well detailed as resin kits from Tabletop World, it is a decent model and reasonably priced, and above all,  is perfect for  a Mediterranean Church for my WW2 Sicily project or my XVII c. battles in Spain , like my siege of Gerona 1684 project.

Its size also convinced me, because it is tall but not too big in its footprint (remember it is 1/72). I got my inspiration with smaller footprint buildings from Sidney Roundwood's blog.


By the way, I got it quite cheap and it also came already built in a second hand app in Spain, so the painting process began almost inmediately after receiving it at home!  With the church I also bought a couple of Italeri mediterranean houses, in 1/72 but perfect for 28mm , and they also came fully built although unpainted :)


I usually paint my scenery with airbrush and expensive paints and materials, but this time I wanted to try something different:

A quick'n dirty way to finish off the building in no time!

The church came built, so I primed it in grey.

1) first step was picking a wide brush and craft paints and basecoated in dark grey the stones and red the roof, although the shingles are not modelled as mediterranean shingles and look like slate plates, but anyway I wanted them red.

2) I then changed the brush and started painting individually some stone and bricks and shingles, randomly in different shades of grey or red.


3) After that, I washed the whole model in dark brown oil paint with White Spirit

4) 2 days later, I decided to paint different colors of oil dots in the the whole model, and then fading the dots with the wide brush moistened in white spirit, with vertical brush strokes.

5) 2 days later the fun began with the drybrushing stage, light grey and creamy color in all the stone parts, and light red on the roof.

6) then some static grass and matt varnish.


It was very simple and easy to do , and the result is satisfactory, although it is not an award winning piece of terrain, it does it job in the gaming table.


I hope you find it useful !


Saturday, 4 December 2021

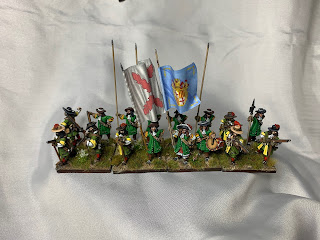
Speedpainting/Quickshade : Tercio de Barcelona (in its early uniform)

 Hello guys,


A couple of months ago I bought from a Facebook friend, Richard O' Connor, a bunch of (mostly) upainted miniatures from North Star 1672, but also 9 painted miniatures in green and yellow uniform, from Tercio of Barcelona in its first uniform for the early 1670's. They were based in round single bases, so I thought about rebase them on my regular 4cm x 4cm bases for infantry, and also painted the rest of miniatures in order to get a full unit (usually 16 infantry models in my armies). 


I wanted this to be made "fast" so I took several models I had, like the "French" grenadier on the left from Northstar 1672, a Reiver Castings new Spanish model, and new Spaniard musketeers from Northstar 1672.  

In order to paint them quickly, I airbrushed them all in green, and then just applied a basecoat of all the others colors. They were ready for the Quickshade application! I slapped on the thing all over the miniatures, lightly thinned with White Spirit, and then leave them to dry for 48 hours... Then I re applied the basecoat colours and some minor highlights (2-3 coats of lighter colors), then a matt varnish coat, and they were ready to fight.  

That is why this Tercio was speed painted...because I had half unit painted already by another painter, and the other part, quickly painted with the Quickshade method!

The blue flag with Barcelona´s coat of arms is from Minairons miniatures, a Spanish based company, the other one, generic with the Burgundy cross... I don't remember.


They are now ready to take part in Catalonian campaign against Schombergs' French forces, that were defeated in Bellegarde fortress and Maureillas field battle in 1673-4.  You can read that action here in the blog :

https://spanishleadpainting.blogspot.com/2019/02/franco-dutch-war-spanish-victories-at.html


I have another post in this blog dealing with Tercio de Barcelona, but in its later uniform:

you can read it here :

https://spanishleadpainting.blogspot.com/2019/09/late-xvii-c-tercio-de-barcelona.html


Here you have more shots of the unit:


I hope you like it !


Saturday, 23 October 2021

Terrain month: 28mm Artillery position

 Hello mates,


I read on Twitter that October was indeed #Terraintober, a month in which a wargamer should paint a piece of scenery, so I thought about my half built earthworks that have been laying around for months and started working on that unfinished project (from a long list of unfinished projects!).

So here it is, I just have finished the artillery position from scratch, made of expanded polystyrene, beach sand, wooden stirring sticks /balsa wood and Renedra's plastic gabions. I added Warfare Miniatures  "Chevaux de Frisie" and also some bits from good old Warhammer 6th edition Empire cannon.

It has been a pretty easy project, with just some basic airbrush and drybrush paintjob.


I added also some static grass because the whole thing seemed a littled boring to me, just in earthy brown tones. Also the details here and there break the monotony. 


the building was easy and fun, although not as quick as I initially thought, because of the 2 part plastic gabions. I built the artillery position before getting my 3d printed gabions... So next time I build earthworks, I will use my 3D printed gabions and my recently ordered Avanpost positions !


For the sand, I mixed PVA glue with beach sand from my area, and art store cheap brown paint and covered the whole thing (but the gabions and wood!) then just I airbrushed the main colours with Vallejo paints thinned with airbrush thinner (Ammo Mig) and It worked perfectly, the Vallejo Model Color range is fully "airbrushable" I recommend it for terrain and big things.


Here is the finish result with different miniatures just  to give an idea of the size 


I hope you like it !


Wednesday, 22 April 2020

More scenery: 28mm plastic Barn


Hello again!


Here you have a very quick & easy project; Renedra's plastic Barn. 

This little piece of scenery is very easy to clean and build, and of course, to paint. I just primed it in Panzer grey, Ammo Mig spray can, after that, I airbrushed only two colours, blue-grey in the roof, for a slightly fantasy look (you know, blue shingles=medieval fantasy) and chocolate brown for all the wooden planks.

After that, I tried a new (for me) technique; to apply several citadel washes to modify the tone of some shingles and wooden planks all over the barn, painting with the ink here and there, to break the monotony, and make the model more interesting. 

next step was airbrushing gloss varnish all over the barn, and give the model some oil washes and oil fading as follows.

I painted several dots of white, yellow, browns tones in the roof, with Ammo Mig Oilbrushers, a very interesting tool for me, much better than using old oil tubes (they have a tendency to get stuck). And a general dark brown wash in the brown part of the barn, and then leave it to dry 48h. 

The funny and easy part wash the drybrushing step,  beige for the brown and light grey for the blue roof... It really gives life to the building, highlighting all the parts in a quick and effective way.

The final part was painting the metal details a giving them a black and an orange wash to give it the sensation of rust,  some green moss in the roof ( Just to give it some green touches) and Voilá, matt varnish and finished.

Actual painting time, a couple of hourse at most... It will not win a painting competition, but is nice enough for me, and it fulfills its role :)

I have not made a base for it, because I don't know yet if I will field the Barn alone or as part of a larger farm... so, for now, without base, If I made a large one, with it, I will show it here.

Cheers!


Monday, 6 April 2020

Plastic scenery: Citadel Forest


Hello guys!

I have completed a very quick and easy piece of scenery, a forest ( well , 3 trees in a base) by Games Workshop, I bought it second hand, very cheap, and had it laying around several months until last week.


I cleaned all the parts and branches of the trees and sanded the mould lines, then primed in dark grey (Panzer grey by Ammo Mig), normally I would have painted the basecoat with airbrush, but in this particular case, I thought it would be fine If I used a wide a brush.


                                         primed

                                         basecoat

                                         drybrushed
                                         static grass


The process was very quick, just a base coat of arts store paints, the same I use to paint my scenery and terrain boards,  cheap paint,   dark brown or chocolate for the base, leaving the rocks in dark grey, and then the same on the trees, dark brown all over them.

the next step was drybrush all the kit, for the ground, ochre drybrush all over the base (avoiding the rocks) and finally a drybrush coat of beige. For the rocks 3 different shades of lighter greys until almost white for the edges of the rocks. And for the trees, I used Vallejo beige brown for the drybrush coat and a second coat of beige brown plus beige or white.

When the forest was painted, came the funny part, I substituted the plastic leaves of the trees (tedious to paint and unnatural) with Noch leaves in different shades, not expensive and very useful for this kind of work.   


the finished scenic piece:


Cheers!